
Wow the rubies is much more movie-accurate, but its height is so much shorter than kelloggs, can that fit a head properly?
Ah 9 u may need to customise on the head fin first...
9's Clone helmet project


Thanks dan for the links! And yes i been haunting clonetroopers.net since last week....haaa...bugging them with a few questions on my own.
I guess i should take my time....pace myself...i dun wanna rush it and burn out...as i couldn't acquire the rest of the armour parts that soon anyway.
Right now the original kelloggs version sure looks out of shape when compared to the Rubies helm. But the Rubies version seems almost impossible to wear, probably my chin would be visible. Hahaa
Awwee's suggestion sounds good, shaving off the excess neck area, but wouldn't that make the helmet exposed at the bottom? Im not sure if it will look better or worse.
Firstly what i need to do is to readjust the helmet size to fit my darn big head. I really had to force the helmet on. (if both front and back are velcro-ed together), my high cheekbones helps keep the helmet from moving on while im wearing it.
Faie i will check with u on the movie accuracy. hhaaa
Line of sight is ok, my eye level is on par with the visor level.
(wondering if it's more accurate to lengthen the visor ends)
Currently visor lens are fixed on (or rather ...pasted on) from the outside, a minor curve groove which the lens sit on. Is it ok to shave off the groove and fix it from the inside? But doesn't it enlarge the visor size?
I guess the fins have to wait till the size is adjusted proper, so can gauge roughly how the fins gonna look like.
I will try take some photos, maybe add some dimensions too, try to do it step by step, at the same time seeking advice here, if you guys don't mind. Haaa
My options are still open on which type of clone to do up:
a) plain clonetrooper
(i dun think this is as impressive as a stormtrooper...hence other options)
b) red clonetrooper

(note the 4 red dots on the chest piece)
c) red ARC trooper

This comes with the belt pouches, kama skirt and of coz the rangefinder on the helm. I wonder how different the helmet for this differs from the above two, as you can see the visor actually stretches all the way to the earpiece.
I guess i should take my time....pace myself...i dun wanna rush it and burn out...as i couldn't acquire the rest of the armour parts that soon anyway.
Right now the original kelloggs version sure looks out of shape when compared to the Rubies helm. But the Rubies version seems almost impossible to wear, probably my chin would be visible. Hahaa
Awwee's suggestion sounds good, shaving off the excess neck area, but wouldn't that make the helmet exposed at the bottom? Im not sure if it will look better or worse.
Firstly what i need to do is to readjust the helmet size to fit my darn big head. I really had to force the helmet on. (if both front and back are velcro-ed together), my high cheekbones helps keep the helmet from moving on while im wearing it.
Faie i will check with u on the movie accuracy. hhaaa
Line of sight is ok, my eye level is on par with the visor level.
(wondering if it's more accurate to lengthen the visor ends)
Currently visor lens are fixed on (or rather ...pasted on) from the outside, a minor curve groove which the lens sit on. Is it ok to shave off the groove and fix it from the inside? But doesn't it enlarge the visor size?
I guess the fins have to wait till the size is adjusted proper, so can gauge roughly how the fins gonna look like.
I will try take some photos, maybe add some dimensions too, try to do it step by step, at the same time seeking advice here, if you guys don't mind. Haaa
My options are still open on which type of clone to do up:
a) plain clonetrooper
(i dun think this is as impressive as a stormtrooper...hence other options)
b) red clonetrooper
(note the 4 red dots on the chest piece)
c) red ARC trooper
This comes with the belt pouches, kama skirt and of coz the rangefinder on the helm. I wonder how different the helmet for this differs from the above two, as you can see the visor actually stretches all the way to the earpiece.
Anyone has any idea what's bondo bondo in sg?
I was a home fix-it shop earlier...don't see any suitable material
for sculpting on the kellogg's helm.
Issit cement? I saw silicone...but i dun think that's suitable?
One more Q, how to reinenforce the thin helmet? Using?
How to make sure if its evenly reinenforced?\\
THanks!
by the way im keeping a log of my progress here...any update, i will put it up :
http://9.liquidblade.com/?page_id=273

For minor modifications and reinforcement within the helmet, I'd recommend 2-part putty... But using too much of it would increase the weight of the helmet pretty significantly...
Reinforcement is usually only required for softer helmets, esp vinyl ones that tend to warp... What material is your helmet made of?
Reinforcement is usually only required for softer helmets, esp vinyl ones that tend to warp... What material is your helmet made of?
Desmond 'Vampire 2' Soh
TI/ID/TX 5850
JRS Cadet Mentor
Singapore Garrison
501st Legion
TI/ID/TX 5850
JRS Cadet Mentor
Singapore Garrison
501st Legion
I use a combo of 0.080 styrene sheets (from ART FRIEND) and Alteco "A+B EpoPutty" to create small armor components. But a word of caution, the putty can harden pretty quickly. Although instructions at the back of the EpoPutty packaging mention dabbing water on the surface to 'slow down' the hardening, don't do that. The putty won't cure at all and will become hard paste at best.9 wrote:Anyone has any idea what's bondo bondo in sg?
I was a home fix-it shop earlier...don't see any suitable material
for sculpting on the kellogg's helm.
think my helmet is pretty thin...im worried if i reinenforce....might be uneven in certain areas.GetzJedi wrote:For minor modifications and reinforcement within the helmet, I'd recommend 2-part putty... But using too much of it would increase the weight of the helmet pretty significantly...
Reinforcement is usually only required for softer helmets, esp vinyl ones that tend to warp... What material is your helmet made of?


(this photo taken after both ends are fastened by some tape, end to end)
Ah....A+B? the brand is called EpoPutty?renzaijh wrote: I use a combo of 0.080 styrene sheets (from ART FRIEND) and Alteco "A+B EpoPutty" to create small armor components. But a word of caution, the putty can harden pretty quickly. Although instructions at the back of the EpoPutty packaging mention dabbing water on the surface to 'slow down' the hardening, don't do that. The putty won't cure at all and will become hard paste at best.
Maybe later i pop by fixit shop, take some secret photos of the types....
heh
*ninja*
The manufacturer is ALTECO and the product name is
"A+B EpoPutty"
Easily available in neighbourhood hardware shops. Just look out for two rolls in a plastic packaging slapped onto a card backing. One roll is metallic blue which is the RESIN and the other is silver which is the HARDENER. Knead equal portions of the two together until they become dull yellow in colour. Apply the putty onto areas to 'patch up'.
Once hardened (approx 2.5 hours), the 'puttied' surface will have a semi-glossy look. Then you can sand and paint it swee swee.
Washing the putty off the hands can be a pain in the butt though.
-
Jedi_slayer

- Posts: 254
- Joined: Fri Nov 18, 2005 7:43 pm
- Location: Kamino
-
Plo Strax-Avix

- Posts: 655
- Joined: Sun Oct 02, 2005 5:27 pm
- Location: Grips Central
Nine, I'd be veeeery careful with that Kellog's Clone lid. I have 7 of them and decided to sell off 5 after 2 of them developed tears along a few of the folding lines even when left in storage.
I'd suggest you use sheet styrene, or better, very thin sheet aluminum to reinforce all around the lowest two fold lines right below the frown, along the neck section. That's where my tears developed. If you fasten the 2 halfs permanently, fill and smoothen the gap, then you no longer have to worry about tears forming on any of the other fold lines. I'd still suggest reinforcing selective weak spots by gluing on thin sheet aluminum or styrene, which will also give the whole helmet more support and prevent it from warping or deforming.
I intend to mod at least one of my kellog's Clone lid in the future but its not a priority on my long list of props to work on...
Thanks Plo!
Erm....which fold lines are you referring to?
As for the neck, i believe i will be removing them, the excess...and probably fit a rubber tubing on it, juz like a stormie's. Heh
Would you recommend reinforcing from the inside or the outside?
Outside - more sanding down, prone to uneven surface
Inside - might cut down space for my head and other mods.
*kowtows to the master helmet modder in my opinion, in this forum*
styrene is readily available in singapore?
Here's a picture of what I've been using all along... I swear by Alteco too... The box shown is a 500g pack valued at about SGD20... Got it from a place called Homely Hardware in Ubi...9 wrote:Ah....A+B? the brand is called EpoPutty?
Maybe later i pop by fixit shop, take some secret photos of the types....
heh
*ninja*
Desmond 'Vampire 2' Soh
TI/ID/TX 5850
JRS Cadet Mentor
Singapore Garrison
501st Legion
TI/ID/TX 5850
JRS Cadet Mentor
Singapore Garrison
501st Legion
-
Plo Strax-Avix
- Posts: 655
- Joined: Sun Oct 02, 2005 5:27 pm
- Location: Grips Central
Definitely inside. Don't worry thin alum or styrene sheets won't take up much space. I'm talking about 0.5mm thick sheets.9 wrote:Would you recommend reinforcing from the inside or the outside?
Outside - more sanding down, prone to uneven surface
Inside - might cut down space for my head and other mods.
Try hobby shops, if not then use plastic file folder cover.9 wrote:styrene is readily available in singapore?
Another option for gluing and filling is 2-part epoxy. Read my Vader facemask mod thread for more info.
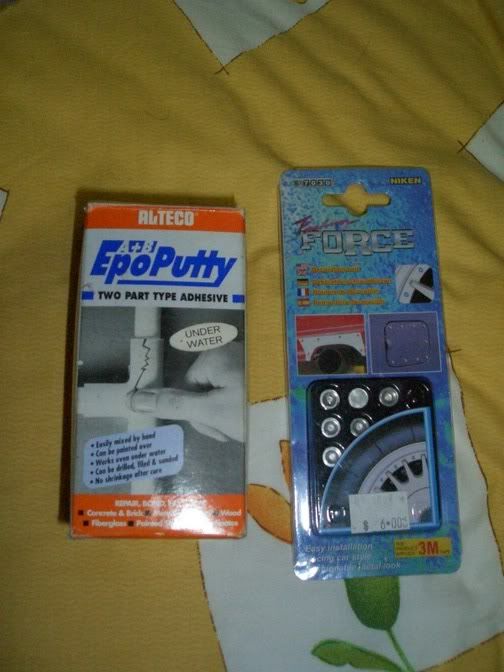
what's the thing on the right hand side?GetzJedi wrote:
i saw the A+B thingy today, but i think different pack...like 2 lipsticks
selling for $6.90 in marsiling. I saw another putty pack....duno good or not...i took a photo.

selling for $9.50...
(ok i saw one retailing at $8.50 in a hardware shop in Rochor center)
the other types of putty were not suitable....